Plank Pose is an excellent exercise but must be performed with proper alignment and technique to avoid strain or injury.
Facts about Plank Pose
- Plank Pose is also known as Phalakasana.
- Phalakasana is pronounced as ‘fall-ack-AHS-anna’.
- It comprises two words: phalaka, which means ‘plank’ and asana, which indicates ‘yoga pose’.
- It acts upon core strengthening.

Plank Pose Yoga
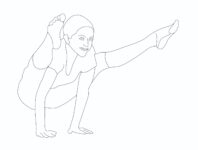
How to Do the Plank Pose Steps
The Plank Pose, also known as Phalakasana in yoga, is an excellent exercise for strengthening the core, shoulders, and arms. Here are step-by-step instructions on how to do it:
- Place your hands and wrists directly under your shoulders and your knees under your hips.
- Spread your fingers wide apart with your middle fingers pointing forward. Press your palms firmly into the floor, creating a solid foundation for the pose. Ensure that your fingers are gripping the mat for stability.
- Draw your shoulders away from your ears and toward your spine. Firmly engage your upper arms towards each other as if trying to squeeze them together.
- Draw your lower belly towards your spine and engage your core muscles. This will help you maintain a straight line from your head to your heels throughout the pose.
- Extend one leg back at a time with your toes tucked under. As you do this, keep your leg straight and engaged. Your body should now be straight from the crown of your head to your heels.
- Slide shoulder blades along your spine and firmly press them into your back. This action will help prevent your shoulders from collapsing or rounding.
- Now, Lift your kneecaps and lengthen your tailbone toward your heels. This action helps create a strong and straight alignment for your lower body.
- Keep pushing the floor away with your palms, and imagine pressing your heels back as if touching an imaginary wall behind you. This engages the entire body and maintains a straight line.
- Draw your legs together without actually moving them physically. This action engages the inner thighs and adds more stability to the pose.
- Look slightly forward at the floor to keep your neck aligned with your spine. Keep your jaw relaxed, and maintain steady breathing throughout the pose.
- You can hold Plank Pose for anywhere from 5 breaths to a few minutes, depending on your strength and endurance.
- To come out of the pose, you can either push yourself back into Downward Facing Dog by lifting your hips and pressing back or lower your knees to the floor and rest in Child’s Pose to release tension.
Plank Pose Yoga beginner’s tip
Here are some beginner tips to help you practice Plank Pose with proper alignment and gradually build strength:
Focus on drawing the front of your body up towards the back of your body. This engagement of the core is crucial for maintaining a straight line and stability.
Remember your thighs. Engaging your thigh muscles will help support your legs and activate the abdominal strength necessary for the Plank Pose.
If you’re new to Plank Pose or still building strength, you can practice Half-Plank with your knees on the floor. This variation allows you to keep a straight line from your knees to your head, providing support while you work on your core and upper body strength.
If you’re a beginner or new to yoga, gradually building wrist strength is essential. It’s also helpful to distribute weight evenly through your palms and fingers rather than putting excessive pressure on your wrists.
Maintain a straight line from your head to your heels. Avoid letting your hips sag or lifting them too high.
Consistency is critical to building strength and improving your Plank Pose.
Plank pose benefits
The primary function of the plank pose is to develop the core.
It helps to balance and stabilise the body.
It is suitable for joint health and provides you with a better posture.
It is great for strength building and effective in cardiac muscles.
It is one of the best yoga poses to strengthen the triceps muscles.
It is suitable for bone health.
It strengthens the back and thigh muscles.
Contraindications
Shoulder injury
Wrists injury
It shouldn’t be performed if one is experiencing sudden pain.
It may be avoided during pregnancy.
Chronic injury to arms and back
Precautions
The neck should be relaxed and in line with the spine, gazing down.
Core down, up, and in towards the spine.
The toes should be tucked, and the heels should be pressing backwards.
Preparatory Poses
Downward Facing Dog
Four-Limbed Staff Pose
Counter Pose
Upward Plank Pose
Modifications & Variations
Begin in a regular Plank Pose position. Instead of keeping your legs straight, lower your knees to the floor. Maintain a straight line from your head to your knees. Engage your core and hold the position.
Start by coming down onto your forearms. Stretch your legs behind you, keeping them straight and your body in a straight line. Engage your core and hold the position.
Use a stable surface, such as an elevated step or a yoga block, to place your hands on. Assume the Plank Pose position with your hands on the high surface. This modification reduces the weight on your wrists and can be less intense on your core.
Start in a regular Plank Pose. While maintaining the plank position, alternate bending one knee and bringing it towards the ground without letting it touch the floor. This modification adds dynamic movement to the pose and increases core engagement.


In yoga blogs, this topic has hardly covered. Well done job